Managing Users and Permissions in Your Lumanu Workspace
This guide walks you through managing team members within your Lumanu workspace, including how to invite new members, assign or update roles, and manage user permissions. You'll also learn how to adjust access levels and remove users when needed.
1. Adding a Team Member to Your Organization
To bring new users into your Lumanu workspace:
Go to the Team section under the Workspace Settings tab. You will find this by clicking on the name of your business in the upper left corner of the app.
Click Add Members, then enter the email address of the person you want to invite.
Assign Role(s) based on their responsibilities:
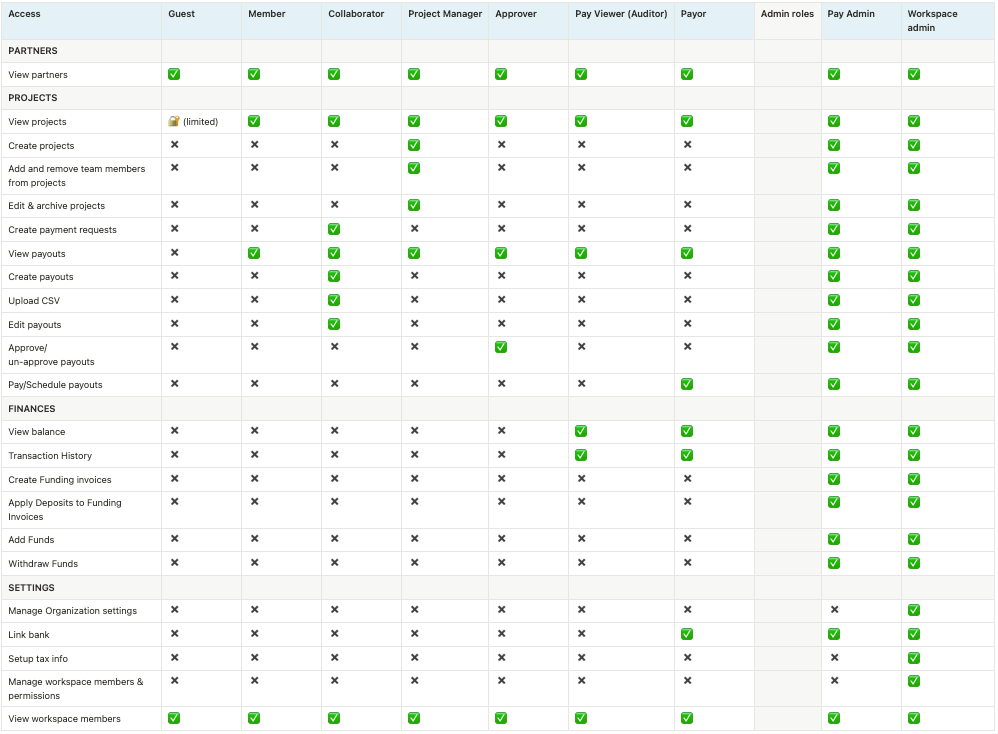
When selecting a role, the Lumanu app will provide you with a short summary of the permissions tied to each one. You can also find a detailed breakdown of each role, below:
Once the invite is sent, the new team member will receive an email with instructions on how to set up their account.
2. Updating Permissions for Existing Team Members
If you need to change a team member’s role or update their permissions:
Navigate to Team within the Workspace Settings.
Select the user whose permissions you want to adjust.
Click the 3 dots and click Edit Role and choose from Admin, Finance Manager, or Viewer etc roles as needed.
Confirm your changes by saving them.
3. Removing a User
To remove a team member:
Go to Team under Workspace Settings, find the user you want to remove, click the 3 dots next to their name and select Remove User.
Once removed, the user will lose all access to your workspace.
4. Best Practices for Managing Permissions
Admins should be assigned to those who handle both financial and team management.
Finance Managers can be given to those focused on payment-related tasks but don’t need access to user management.
Viewers are ideal for external stakeholders or team members who need visibility but no decision-making capabilities.
For a detailed step-by-step guide, including screenshots of each process, you can explore Lumanu's full help center guide HERE.

